最近新しく発売されたkindle黒が届いたが、scansnapで作ったPDFを入れてみたら文字がかすれて読めなくなって悲しかったので、なんとかするスクリプトをJRubyで作った。
http://github.com/shokai/scansnap_adjust_images_kindleに連番画像の補正プログラムと、連番画像をPDFにまとめるautomatorアプリを置いておいた。
JRuby1.5+Java1.5以上なら動くと思う。
scansnapの設定は橋本商会 scansnapと裁断機を買って本を電子化しまくるに書いたのと同じ。白黒ページはスーパーファインのグレースケールで取り込んでいる。
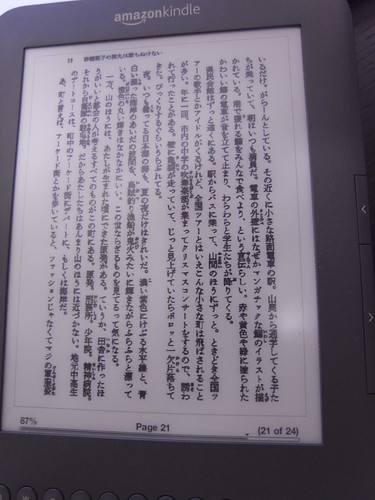
文庫本を補正した場合こうなる。
日本語の文庫本を読めるようにする事を目的に作ってるので、他の判型だとちょっとダメかも(理由は後述)
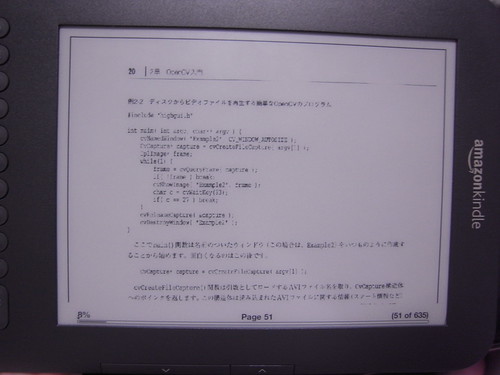
詳解OpenCVという本を、補正をかけずに表示したところ。
文字の中でも線の細い部分だけが、kindle上でリサイズした時に消滅するので字が読めない
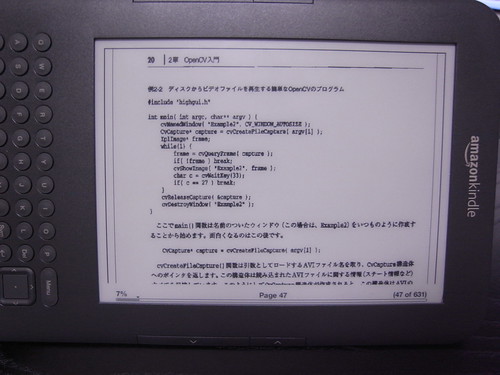
詳解OpenCVの同じページ補正するとこうなる。
それなりに読めるが、線の密度とか計算せずに全て太らせているのでアルファベットや記号がところどころ融合して読みづらい。
■やっている事
scansnapで自炊した本をそのままkindleで表示するには色々問題がある。
- kindleの解像度は800×600だけど、画面内にページ位置等のUIが入るし画面を縦横回転させたり拡大縮小できるので、表示時にkindle上でリサイズされる。この時、線が細くて薄い部分が消滅してしまって、文字がかすれて読めなくなってしまう。
- scansnapで取り込んだままのPDFファイルでは、コントラストが弱くてとても読みづらい。
- ページの上下左右の余白が邪魔で、kindleに全画面表示した時に小さくなってしまう
kindle上でリサイズされる事を前提として、文字が消えてしまうような細い部分を太くしてやるしかない。
しょうがないので、コントラストを上げたり、拡大縮小されるのを前提として先にアンチエイリアス?的な処理をしたり、余白を切り取ったり、リサイズしたりするようにした。
上下左右を裁ち落とし→リサイズ→グレースケール化→2値化→黒の周りを#999999で太らせるという処理をしている。
■画像を補整する
まずPDFから連番画像に戻す。MacやLinuxなら、pdfimagesというツールを使うといい。
# for Mac

% sudo port install pdfX


# for Ubuntu

% sudo apt-get install xpdf-utils


# extract images

% mkdir -p ~/tmp/mybook

% pdfimages -j ~/Documents/book/mybook.pdf ~/tmp/mybook/
もしくはAcrobat Proを買って「書き出し」でもできる。
補正する。githubから俺の作ったツールを持ってくる。
% git clone git://github.com/shokai/scansnap_adjust_images_kindle.git

% cd scansnap_adjust_images_kindle
で、先ほど作った連番画像のディレクトリを元にして、補正した連番画像を作る
% jruby kindlize_images.rb -help

% jruby kindlize_images.rb -i ~/tmp/mybook/ -o ~/tmp/mybook_kindle/ -w 1200 -h 1600 -cl 150 -cr 150 -ct 120 -cb 180 -t 240
出力ディレクトリは無ければ自動的に作成される。
上はオライリーの本の場合の裁ち落とし。
文庫の場合はこんなパラメータ
jruby kindlize_images.rb -i ~/tmp/mybook/ -o ~/tmp/mybook_kindle/ -w 1200 -h 1600 -cl 30 -cr 30 -ct 80 -cb 115 -t 220
作った連番画像をPDFに戻すには、cloneしたgitリポジトリ内のimages2pdf.appを使えばいい。MacのAutomator.appで作ったアプリ。
Preview.appでもPDFのページを並べ替えたりできるが、連番ページを順番に入れる事はできなかったので作った。
■問題点
文字を太らせる処理は、1 pixelずつグレーで周りを塗っているだけなので、文字のサイズや密度を考慮していない。
処理速度も遅い。300ページの本でも1時間近くかかる。まあ読む速度より遅くはないからいいや。もっとたくさんkindleに入れたくなったらC++でOpenCV使って書き直す。
■ソース
Javaのjavax.imageioをRubyから使うのが簡単な画像処理に便利なので、JRubyを使ってます
kindlize_images.rb
#!/usr/bin/env jruby

# -*- coding: utf-8 -*-

# ディレクトリ内の画像を全てkindleで読みやすいように2値化、アンチエイリアス、リサイズする

# イラストも2値化されるので、小説などの文字ページ専用。

require 'rubygems'

require 'ArgsParser'

require 'java'

import 'java.lang.System'

import 'javax.imageio.ImageIO'

import 'java.awt.image.BufferedImage'

import 'java.awt.image.WritableRaster'

import 'java.awt.image.AffineTransformOp'

import 'java.awt.geom.AffineTransform'

import 'java.awt.Color'

$KCODE = 'u'


parser = ArgsParser.parser

parser.bind(:width, :w, 'width')

parser.bind(:height, :h, 'height')

parser.bind(:input, :i, 'input')

parser.bind(:output, :o, 'output')

parser.bind(:cleft, :cl, 'crop left (pixel)')

parser.bind(:cright, :cr, 'crop right (pixel)')

parser.bind(:ctop, :ct, 'crop top (pixel)')

parser.bind(:cbottom, :cb, 'crop bottom (pixel)')

parser.bind(:threshold, :t, 'threshold of binarize (0-255)')

first, params = parser.parse(ARGV)


if !parser.has_params([:width, :height, :input, :output, :threshold]) or

    parser.has_option(:help)

  puts parser.help

  puts 'e.g. jruby kindlize_images.rb -i /path/to/in_dir/ -o /path/to/out_dir/ -w 1200 -h 1600 -t 240'

  puts 'e.g. jruby kindlize_images.rb -i /path/to/in_dir/ -o /path/to/out_dir/ -w 1200 -h 1600 -cleft 50 -cright 50 -ctop 80 -cbottom 100 -t 240'

  exit 1

end


p params

WIDTH = params[:width].to_i

HEIGHT = params[:height].to_i

Dir.mkdir(params[:output]) unless File.exists? params[:output]

params[:output] += '/' unless params[:output] =~ /\/$/


Dir.glob(params[:input]+'*').each{|i|

  puts i

  begin

    img = ImageIO.read(java.io.File.new(i))

  rescue => e

    STDERR.puts 'image load error'

    STDERR.puts e

    next

  end

  puts "size : #{img.width}x#{img.height}"


  if params[:cleft] or params[:cright] or params[:ctop] or params[:cbottom]

    params[:cleft] = 0 unless params[:cleft]

    params[:cright] = 0 unless params[:cright]

    params[:ctop] = 0 unless params[:ctop]

    params[:cbottom] = 0 unless params[:cbottom]

    img = img.get_subimage(params[:cleft].to_i, params[:ctop].to_i,

                           img.width-params[:cleft].to_i-params[:cright].to_i,

                           img.height-params[:ctop].to_i-params[:cbottom].to_i)

    puts "crop : #{img.width}x#{img.height}"

  end


  # リサイズ

  if img.width.to_f/img.height > WIDTH.to_f/HEIGHT # 指定されたWIDTH,HEIGHTよりも横長の画像

    scale = WIDTH.to_f/img.width

    img_resized = BufferedImage.new(WIDTH, (scale*img.height).to_i, img.type)

  else # 縦長

    scale = HEIGHT.to_f/img.height

    img_resized = BufferedImage.new((scale*img.width).to_i, HEIGHT, img.type)

  end

  puts "scale : #{scale}"

  AffineTransformOp.new(AffineTransform.getScaleInstance(scale, scale), nil).filter(img, img_resized)

  puts "resized : #{img_resized.width}x#{img_resized.height}"


  # 固定サイズ画像にはめこむ

  img_frame = BufferedImage.new(WIDTH, HEIGHT, img.type)

  graph = img_frame.graphics

  graph.color = Color.new(255,255,255)

  graph.fillRect(0, 0, WIDTH, HEIGHT)

  if WIDTH > img_resized.width

    graph.drawImage(img_resized, (WIDTH-img_resized.width)/2, 0, nil)

  else

    graph.drawImage(img_resized, 0, (HEIGHT-img_resized.height)/2, nil)

  end

  puts "set in frame : #{img_frame.width}x#{img_frame.height}"

  img = img_frame


  # 2値化

  for y in 0...img.height do

    for x in 0...img.width do

      pix = img.get_rgb(x, y)

      r = pix >> 16 & 0xFF

      g = pix >> 8 & 0xFF

      b = pix & 0xFF

      gray = (r+g+b)/3

      if gray > params[:threshold].to_i

        pix = 0xFFFFFF

      else

        pix = 0x000000

      end

      img.set_rgb(x, y, pix)

    end

  end

  puts "binarize"


  # 膨張

  img_dilated = BufferedImage.new(img.width, img.height, img.type)

  for y in 1...img.height-1 do

    for x in 1...img.width-1 do

      if img.get_rgb(x, y)&0xFF == 0

        img_dilated.set_rgb(x, y, 0x000000)

      elsif img.get_rgb(x-1, y)&0xFF == 0 or img.get_rgb(x+1, y)&0xFF == 0 or

          img.get_rgb(x, y-1)&0xFF == 0 or img.get_rgb(x,y+1)&0xFF == 0

        img_dilated.set_rgb(x, y, 0x999999)

      else

        img_dilated.set_rgb(x, y, 0xFFFFFF)

      end

    end

  end

  img = img_dilated

  puts "dilate"


  out_name = i.split(/\//).last

  out_type = 'bmp'

  begin

    ImageIO.write(img, out_type, java.io.File.new(params[:output]+out_name))

    puts 'saved! => '+params[:output]+out_name

  rescue => e

    STDERR.puts 'image save error'

    STDERR.puts e

    next

  end

}