「量子化(Quantitate)」と「ラプラシアン演算(Laplacian)」というのをやってみた。
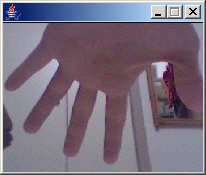
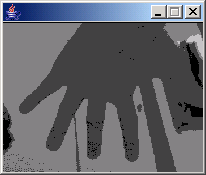
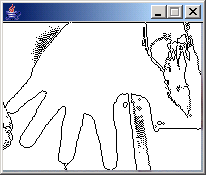
順に元画像 → 4段階に量子化 → 輪郭抽出完了と処理した。
(ラプラシアン演算とラプラス変換がどう違うのか俺はよくわからない)
■参考サイト
・アルゴリズム入門 : 第 3 章 画像処理入門 1
・動画処理II – PukiWiki Plus!
■しくみ
Source Code (Processing 0124 Beta)
まずカメラでキャプチャした全ピクセルを4段階に量子化する。量子化というのはAD変換の事。数万色のカメラ入力画像を今回は4段階にしてしまう事で処理しやすくする。
それからまた全ピクセルをそれぞれ周囲の4ピクセルと比較する。大きかったら黒で小さかったら白にする、という流れ。
動かすにはwebcamが必要。
マウスクリックかEnterキーで、元画像と輪郭抽出後が切り替わる。
importprocessing.video.*;
booleanisDetect=true;//mode
Capturecamera;
colorquants_pixels[];//量子化した画像
colorresult_pixels[];//輪郭抽出結果floatr_ratio=0.299;//RGB比合計して1
floatg_ratio=0.587;
floatb_ratio=0.114;voidsetup(){
size(200,150);
camera=newCapture(this,width,height,12);
quants_pixels=newcolor[width*height];
result_pixels=newcolor[width*height];
}voiddraw(){
if(!isDetect){
image(camera,0,0);
return;
}
//4段階に量子化
for(inti=0;i
colorpix=camera.pixels[i];
floatlevel=(int)(r_ratio*red(pix)+g_ratio*green(pix)+b_ratio*blue(pix))&0xC0;//&192
quants_pixels[i]=color(level,level,level);//draweachpixeltothescreen
}
//周囲(4ピクセル)の平均値と比較する
for(inty=1;y
for(intx=1;x
inti=y*width+x;
floataround=(quants_pixels[i-width]+quants_pixels[i-1]+quants_pixels[i+1]+quants_pixels[i+width])/4;
if(around
elseresult_pixels[i]=color(255);//white
}
}
//結果を表示
loadPixels();
for(inti=0;i
pixels[i]=result_pixels[i];
}
updatePixels();
}voidcaptureEvent(Capturecamera){
camera.read();
}voidkeyPressed(){
switch(keyCode){
caseENTER:
isDetect=!isDetect;//モード切り替え
println(“detect:”+isDetect);
break;
}
}voidmousePressed(){
isDetect=!isDetect;//モード切り替え
println(“detect:”+isDetect);
}
量子化の所を速度重視でビット演算でやったので、ここをもう少し柔軟にしてやればもっと綺麗に分かれるはず。
今回は輪郭線を表示しているけど、その前に(量子化した直後に)ラベリング処理をしたい。
ちなみに、55行目の
pixels[i] = result_pixels[i];
を
pixels[i] = quants_pixels[i];
にすれば量子化後の画像を表示できる。